UPDATED 8/26/2023
“Be Prepared“ is the Boy Scouts long-time motto. A little pre-planning, some training and then lots of practice and you are off to a good start.
“If it’s sun, its fun. If it’s raining, it’s training” Assemble some simple gear and know how to use it.
Being prepared requires having some essential “tools” available as described below but you should also have adequate and appropriate food along for any situation. But that’s not the topic here for an emergency tool kit.
Non “survivalist, prepper, bushcrafter, tacticool, ninja, outdoorsman” etc.
Just a camper…
Everyone has one; but here’s mine: Something small that I am inclined to carry on a belt or in a pocket while out doing anything in the boonies. If it’s “big” you won’t be inclined to take it with you – thus defeating its purpose.
Mine starts with the carrying pouch that can clip to a belt or day pack. It is a standard US Military M1967 Compass pouch, or when rigged upside down on the ALICE clip, is an emergency field dressing pouch. Either way, just the right size for a very basic kit. Any kit should be tailored to your likely locale and possible situation.
Note: Don’t try to fly “commercial” anywhere with some of this stuff! Procure local replacements upon arrival.

Inside it is a standard “drug store” soap dish wrapped with electrical tape. You could just carry the soap dish in a shirt pocket to save the bulk (and therefore more likely to carry it). Wrapped in electrical tape around the edges, it is pretty water/immersion proof. That tape can come in handy as well – be generous.

So what’s inside? Some real basic stuff as you can see below.

This one contains the box itself (collect water), 3 feet of electrical tape, miniature “aim-able” signal mirror, bandages, antiseptic towlette, zip-lock bag with pain killers, heavy-gauge aluminum foil (collecting/heating water etc), miniature butane lighter, magnesium fire-starter block with hack saw blade scraper, longer hack saw blade (“Master Key”), fishing hooks, lure, flies, light and heavy fish line, sinkers, single edged razor blade, snare/repair wire, P-38, compass, “keychain” LED Flashlite (to read / charge compass phosphor at night).
My priority if I could only take two items: The signal mirror and the magnesium fire-starter block with hacksaw blade scraper.
Use that magnesium block to get that fire started; on deep snow, build it on a “log raft”. It will be long gone in the morning, but it warms up the chow hall and coffee in the meantime.

Campfire Raft
So whose idea was this, anyway. XC Ski trip and camp out with friends, Lake Alpine CA circa 1980.
—————————————————————————-
Below: On a larger scale is another kit you might keep with your POV, mountain bike, dirt bike, canoe, kayak or clipped to your utility belt along with that multi-tool and canteen for a day hike. Sized for cross-country day hiking / skiing or just getting stranded in some remote place. This one is packed in a US Military M1956 ammunition magazine pouch; of course any suitable pouch will work – but these are indestructable. Below:

Contents shown here:

A bit more stuff with some “luxury items”:
A 36″ square International Orange “Panel, Marker, Survival, Aviation” NSN 8345-00-140-4232, a 3″X5″ aim-able signal mirror, plastic “survival cards” containing info on signaling, food and water procurement, first aid, shelter building, navigation etc (you DO know all this stuff BEFORE you head off to the bush don’t you?), combination whistle, compass and waterproof match container (with strike-anywhere matches), indigenous paper currency as appropriate to your likely AO, small green Chemlight, foil packets of tea, coffee, chicken bullion, hard candy, fishing hooks, lure, 25′ of 50 pound test fish line, stainless steel pocket knife, magnesium fire-starting block, hack saw blade, wire saw, pain killer meds, small nails, miniature butane lighter and backup compass. Phew!
Note: Food (or bulky means to obtain it) really has no place in an emergency kit that is small enough that you will routinely take along with you. You can “live” for 3 weeks without eating, but it has a big psychological value. That said however, you should also have a separate small container with some concentrated food available in your gear. That keeps your most important survival tool functioning – your brain.
The small round object in the lower left corner is a spool with 50 feet of # 34 gauge wire for the antenna of the miniature crystal radio receiver inside it (no batteries required). That consists of a toroidal inductor in a fixed tuned circuit driving a crystal diode and high impedance earplug. This is a morale-sustainment device so you can listen to the local news, the Big Game or Golden Oldies while-U-wait. It is broadband tuned, of course depending upon local signal strength. More design details in the “Crystal/Fox Hole Radios” Categories post in this Blog. Crystal radio
“Shoot, a fella’ could have a pretty good weekend in Vegas with all that stuff.”
Major T. J. “King” Kong
—————————————————————————-
Lost? Again?
“I’ve never been lost, but there have been times when I didn’t know where everyone else was.”

Field Expedient Radio Direction Finding
Speaking of radios, if you have a simple “transistor AM radio” you have a great navigation tool. A field-expedient Radio Direction Finder. The ferrite loopstick antenna in these things has a distinct “figure 8” antenna reception pattern. You know, you have to rotate the radio around to find the position needed to hear that AM station the strongest. But the “nulls” in that pattern are what you want – where the signal is the weakest – the null bearings are very sharp and are found off the ends of the radio. (The signals are received the strongest when the target transmitter is broadside to the radio).
Upon rotating the radio about a vertical axis, the signal will drop sharply when the long axis of the radio is pointed either towards or away from the transmitter. If you know the station’s antenna location and frequency, you are in business; you have a Line of Position (LOP); you are somewhere on that line. It takes 2 or preferably more LOP’s to resolve the 180 degree ambiguity and to develop a “navigational fix” – and there you are (more or less).
I carry an Aviation Sectional map of the areas I may be in. They have all kinds of useful information as well as the exact location of most AM radio stations’ ANTENNAS , their frequency and callsign. (A generic map will also work – just less precise as to transmitter location. Resulting accuracy all depends upon how far away it is from you.)
On the above photo I had taken LOP’s from KNBR, KCBS and KRAK (it was located in Sacramento at the time). When the signal “nulls”, sight along the long axis of the radio to a distant object in exactly that direction then use your compass to determine the objects’ azimuth; then plot it on the map – in BOTH directions to/from the station..
If you’ve already oriented the map (true north) with your compass you can just use the radio edge as a ruler to plot the LOP as I have shown here pointing to/from KCBS. The 3 LOP’s converged. Ideally to a point but usually a triangle, sometimes a large one. I was hiking in the “East Bay Hills” and I was inside that triangle. It works! Quite well. Try it! This technique was a staple in the 20th century for aircraft and vessel navigation.
(When using a radio and a compass in the field be aware that the speaker magnet in the radio will have a strong local effect on the compass!)
If you are lost (say, in the North Pacific ocean) and you tune in KCBS on 740 KHz (they will announce their call sign/location) you can just follow the null bearing in. You know you are somewhere West of California (I hope you know at least that!) so that fact – the sun rises in the east if you’re really confused – resolves the 180 degree bearing ambiguity. Got it? Steer a course towards KCBS, keeping its signal in the Null.
Note: The best bearing accuracy will present during the daytime when the signal arrives directly via ground wave. At night, the ground wave and reflected sky wave can interfere with each other producing a difficult signal to work with. Also any signal arriving via sky wave at night can be arriving from somewhat different directions than the station azimuth, producing null errors.
———————————
More on Compasses:
Of “course” if you are navigating in southeastern Siberia using a silk E&E map like this one to find your way around Lake Baikal, you can use any of several types of compasses.

Compasses for LandNav work
The M2 Artillery Compass (AKA Brunton/Transit) on top, a simple Orienteering type or my personal favorite, the standard military issue “U.S. Compass, Magnetic” Lensatic type on the right.

M2 Artillery Compass
The M2 compass is used for taking very precise horizontal azimuth bearings in Mils. A Mil being the angle subtended by one meter at 1000 meters (6400 Mils = 360 degrees). The M2 also permits the accurate measurement of vertical angles with the inclusion of the linear bubble level and moveable protractor.
For example, in the “vertical” mode you can measure the altitude of Polaris above the horizon in the northern hemisphere where that star is visible. That angle is equal to your Latitude with fairly high accuracy. Mariners in antiquity knew this…Simple, very handy.
(Combined with an accurate watch and a “shadow stick” you can also determine your Longitude at local noon. You are right here!)

Orienteering Compass
The basic, lightweight Orienteering or “baseplate” compass is convenient for working simple LandNav problems with a map. Other versions include a flip-up sighting mirror and sometimes a magnetic variation offset capability as well.

Lensatic Compass
Or above: the induction-damped M-1950 Lensatic which is good for both. In addition to general LandNav work, the Lensatic is especially good for taking Resection fixes (to locate your own position on a map relative to distant landmarks, a common task.) Or for identifying a distant “walk to” point along your intended route bearing.
Night Nav: Prior to the mid-1950’s military compasses (and civilian watches etc) had self-glowing indicators. These were painted with phosphor powder mixed with radioactive Radium 226 to glow “indefinitely”. With a half-life of 1620 years Radium has staying power; the phosphor material not so much.
In practical usage they would glow for many years before the phosphor degraded from Alpha particle bombardment. The brightness faded although the Radium was still present. The use of Radium eventually ended due to the health concerns of broken devices liberating this material. Inhalation of the resulting “dust” was a particularly hazardous.
Post WWII/Korean war era issued Lensatic types can use radioactive Tritium gas (AKA “3H”) and phosphor powder mixed in tiny glass vials to be self luminous (self excited) at night. The current performance specification, MIL-PRF-10436N does not require a radioactive source although the wording is somewhat ambiguous to provide the prospective vendor some design latitude in delivering “self luminous” operation. Radioactive excitation is optional (Reference 75). If radioactive material is present the compass will be marked accordingly.
However Tritium has a half-life of 12 years so older “surplus” compasses on the market can be quite dim after manufacture (of the Tritium itself which could be much older than the assembled compass). Caveat emptor.
My go-to lensatic compass (NSN 6605-01-196-6971, Oct 1986 manufacture date) is an example with simple phosphorescent markings, chargeable with a flashlight for night Ops. Apparently Tritium was not always a requirement of that MIL Spec/NSN definition, at least in 1986.
The waiver of a radioactive exitation feature was probably related to the non-availability of Tritium from U.S. production reactors in the 1980’s. They were our only domestic source of that hydrogen isotope before a new reactor(s) was built later on. (We had been buying Tritium from Canada in the meantime.)
The Lensatic’s are marked along the straight edge for 50,000:1 metric maps . Perfect for use with military (DMA/NGA) maps but it takes a bit of conversion work to make linear measurements on a typical civilian 24,000:1 USGS “quadrangle” map. No biggie. I modified mine with a simple scribe line on the scale indicating 1 mile when using USGS 7 1/2 minute topo maps.
Of course if you forget to take a compass with you – or have it available when and where circumstances dictate, here’s a pair of good alternatives:

Watch and wristband compasses
Pretty likely to have it with you, under any circumstances. A liquid-damped, phosphorescent wrist compass and analog watch.
When the hour hand is pointed directly at the sun, South is halfway between the hour hand and 12 when in the northern hemisphere, or vice-versa. Be sure to de-correct for daylight savings time if necessary. Reasonably accurate, sort of a “reverse sundial”. (Compass not free to rotate in above photo.)
The versatile Lensatic compass is my preferred type. What’s yours?
The best reference for LandNav, particularly with the military compasses is U.S. Army Field Manual FM21-26, “Map Reading and Land Navigation“. (Reference 76). For civilian Orienteering with baseplate compasses, “Be Expert with Map and Compass” is excellent. (Reference 77).
“I don’t need to know any of this crap – I have GPS on my Smartphone”.
Ha! Good luck with that.
——————————————————————————–
Forgot your tent? Bleeding? Starting to snow? Hungry? Remember The Rule of Three’s to prioritize your efforts:
You can live:
3 weeks without food
3 days without water
3 hours without shelter (extreme weather)
3 minutes without air
3 seconds without blood and
3 micro seconds without WiFi access for Smart Phone Zombies
So build a hootch long before you start stalking that Holstein for a steak dinner….And ALWAYS work on your signalling! (assuming you WANT to be located – if you don’t, work on your camouflage).
Field Expedient Hootches:

The beginnings of your House of Sticks, ready for the thatch covering. Understand that debris shelters such as these are very time and energy intensive to put together, probably not worth it unless you have nothing else, harsh weather is moving in -and- adequate time and initial energy available. (Like food, shelter can have significant psychological value beyond the obvious utility.)

Hasty Lean To Shelter USMC MWTC
A Hasty Lean-To shelter. Quick, simple effective. Cover with pine boughs, insulate the floor, build a “heat reflector” out of logs/branches. Those don’t actually reflect much if any heat, but they are better than “nothing”. They do block the wind. Get a fire going out front. This one was a Model Home open house at the USMC Mountain Warfare Training Center. Here trying to figure out which room the PRC-47 goes into.

Basic beach bungalo with fresh crab for lunch!

Or, yer basic hasty-hootch with built-in Mountain Fir Air Freshener! (Don’t cut green branches during training – I found this one when I arrived here. I had a room in the Green Tarp Motel in the background. Honest!)
Pretty comfy and dry inside and you can add an insulated floor as well. Here’s another, an older model:

Debris Shelter
Elsewhere….

Snow Cave next to rock. Donner Summit Feb 1978
Above: Sometimes you can just enlarge an existing space near a tree base or large rock – saves some work. But colder than a regular snow cave. Donner Summit CA during a Navy cold-weather training exercise, MIUW 1920; circa 1978. Mike and I were the residents and a single candle lit the place up quite well and warmed it a bit too. Don’t forget a vent punched halfway up the wall with a ski-pole.
I had left my snow shoes outside overnight – and a heavy snow followed and the wind knocked then over. I couldn’t find them in the morning – had to hump my gear out using only my LPC’s – (Leather Personnel Carriers). The local ski resort guys found the snow shoes the following spring, called me, and I got them back. (I had left the ski resort bartender a description and my phone number) Nice!
Good lesson-learned.

Snow Cave & Breakfast Buffet
It’s convenient if you dig your snow cave just a short walk from the Breakfast Buffet line / Comm Center. Teach your kids some field-craft. They’ll just remember it as an adventure.
For now…….

Cold Weather Training, Mt. Rose Nevada, USN
Or just throw a tarp over your snow trench. US Navy training with MIUW 1920, Mt Rose Nevada. Shadows getting long, temperature falling fast….Time for the Final Exam. February 1977

Snow Cave Double-Ender
Digging a “double ended” snow cave to accommodate 5 guys – makes for easier access. Don’t get your clothes all sweaty while doing this – you’ll regret it later. Next time, get a bigger shovel! An E-Tool is a lousy snow mover. LOL!

Snow Trench Hootch
If you are lazy or just in a hurry, a snow trench makes a decent hootch. This is the Deluxe Model with a branch for a ridge pole to drape your poncho over. Align it cross-wise to the wind if possible. Stick a ski in the snow at each end so your buddies can find you in the morning after that overnight snowfall ! You don’t want to be late for chow…

Or your basic beach cliff cave – very cozy, room for a few friends plus a nice driftwood fire.
Plus a nice beach view to go along with it. Make sure you know when High Tide arrives !!
Then there is the standard US Army “Shelter Half”, 2-man pup tent. Each guy carries half of the parts to make a complete tent as seen below. Heavy, but reasonably good like most military field gear under the circumstances… Don’t have both halves? A single section is adaptable to all kinds of expedient lean-to’s or other useful configurations.

Shelter Half pup tent
Or, you can rig it between two trees:

Shelter-Half tents in the Snow MIUW 1920 Training
Above: The standard issue “Shelter Half” tent works well to block the wind. Buddy-up and set up into the tree line. US Navy cold weather training, Mt Rose, Nevada. January 1979.
(I digress…)

Shelter Half tent on wood frame for displays
Above: The same type of shelter half tent, here rigged on a wood frame for indoor display purposes. (no stakes hammered into the floor).. Two 8′ 2×2, two 82″ furring strips, a couple of 5/16 bolts with wingnuts, 2 conduit clips and some screw eyes at the ends for attachment. I added the line tensioners to ease setup (anywhere) but to also reduce the display space needed in a display. Sprinkle some field gear around, instant vignette.
(Notes to self: Green nylon civ pup tent is 82″ pole-to-pole…Shelter half ridge, pole to pole = 65″, height ~43″. Mil green vinyl poncho = 65 x 77 “.)

Shelter-Half Display Frame
With those wood supports it would be pretty uncomfortable to sleep in – but it works great for indoor displays like this. Veterans Day.
Here is another “field expedient” shelter if needed. In this case at DZ Back Yard for the kids to play in: The 24′ T-10R ParaHootch.

SERE ParaHootch: DZ Back Yard
Just takes a few AB-85 antenna mast sections as shown here – or some bamboo and a few stakes. Versatile!
Back to work:

Igloo spiral construction
Igloos are a basic, well proven shelter from wind and cold. Learn the spiral construction used by the Eskimos. It’s all in the shaping of the interlocking blocks. Near Strawberry CA in the Sierras with the “Young Marines” youth group.
So there you are: Bleeding has stopped, headache gone; everything is set, you are comfy in your Hootch and you know which direction the Safe House is. (125 degrees magnetic: directly below the star Antares 2 hours after sunset, directly below Spica 5 hours after sunset and directly below Regulus 2.5 hours before sunrise). Day signals set out, signal fire going, fresh catfish on the spit, hearing about the big traffic jam on the Interstate with your crystal radio. (And you just heard on the local AM radio station that the Sheriff has just called off the search for Joe Bozo who has been missing in the mountains for the last month.)
——————————————————————————-
However, you need some clean water to drink (a high priority). Maybe even make some tea, coffee or chicken soup as a morale builder. No container? Just look for the omnipresent plastic bottle, available everywhere. After you get your fire started, fill the bottle to the TOP with local, filtered water (you DO know how to make a water filter…), set close to the fire and let the radiated heat BOIL the water to sterilize it.
HowZat? Water boils at 212 degrees F at sea level, (lower temps at-altitude). But most plastic bottles are made of “PETE”, (recycling code “1”) and PETE melts at 482 degrees F. The water can’t get hotter than 212 degrees F so neither can the plastic that is in contact with the water. So the water keeps it “cool” and the bottle doesn’t melt or burn – but the water will boil as radiant heat passes through the plastic.
HA! You say… It works, see below. I once found an empty half-gallon plastic Tequila Mixer bottle and had a nice hot “shower” at a Yuba River campsite with this technique.

Water happily boiling away in a plastic bottle next to the fire.

Pine Needle Tea
If you brought your canteen cup along, make some Pine Needle Tea. If not, you could also boil and brew some tea in that plastic bottle.

Field Expedient Beer Cooler
Or, maybe you will get lucky and find someone’s forgotten cache in their Field Expedient Beer Cooler
—————————————————————————
Here’s an example of a guy who paid attention in SERE school (Survival Evasion Resistance and Escape). He was not happy that we found his survival cache….Notice that he got the sun angles and shadows just right. Good job!

Emergency Snow Signal Construction
Source unknown (but I like him!)
Another useful signalling device that would be very effective in some situations: You want to be found/located by the good guys equipped with thermal imaging systems but don’t want to be seen by unfriendly eyeballs. The handy-dandy MRE heater. Just follow directions (add water) and it gets real hot. No visible light but lots of infra red as the chemical reaction generates about 80 watts of heat (IR energy) for about 10 minutes. Think of an 80 watt light bulb that is invisible to the unaided eye. Neat.
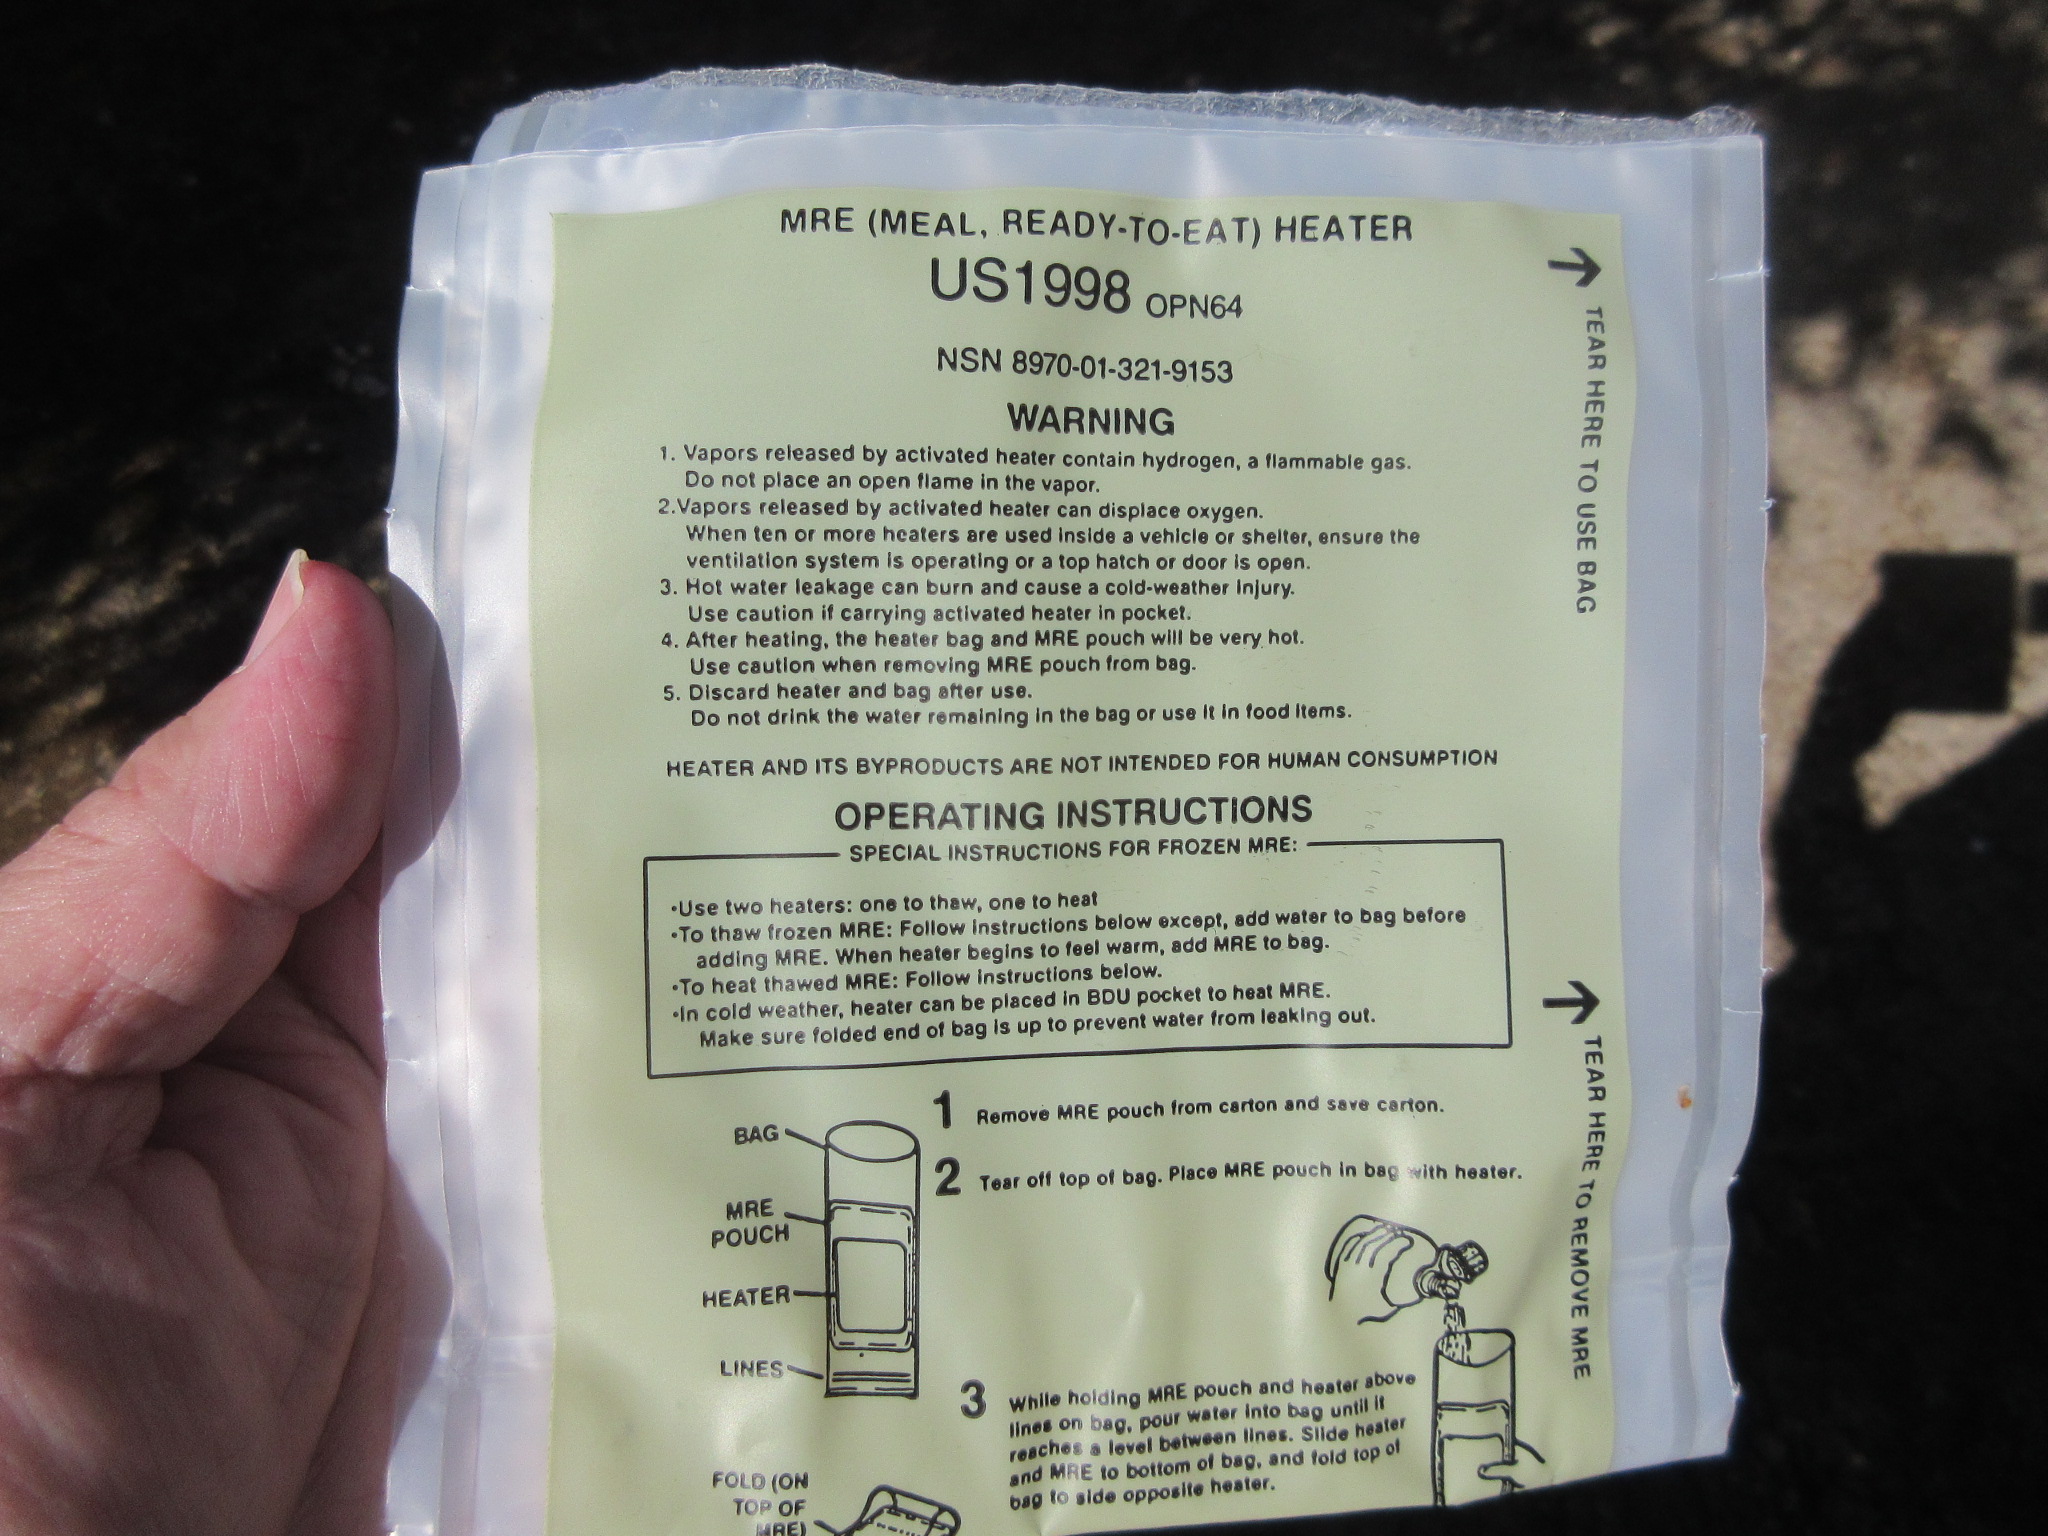
MRE heater for signalling
Instantly visible over long distances with thermal imaging equipment, especially at night against a cool background. No one else can see it, even you. For enhanced effect, tie one on the end of a string and swing it around in a circle, an unmistakeable IR beacon. Or heat up some coffee. NSN 8970-01-321-9153.
Another handy signalling device is one of these; a strobe light used to mark minefields, mines, travel routes etc. At night. NSN 6220-01-081-0592.
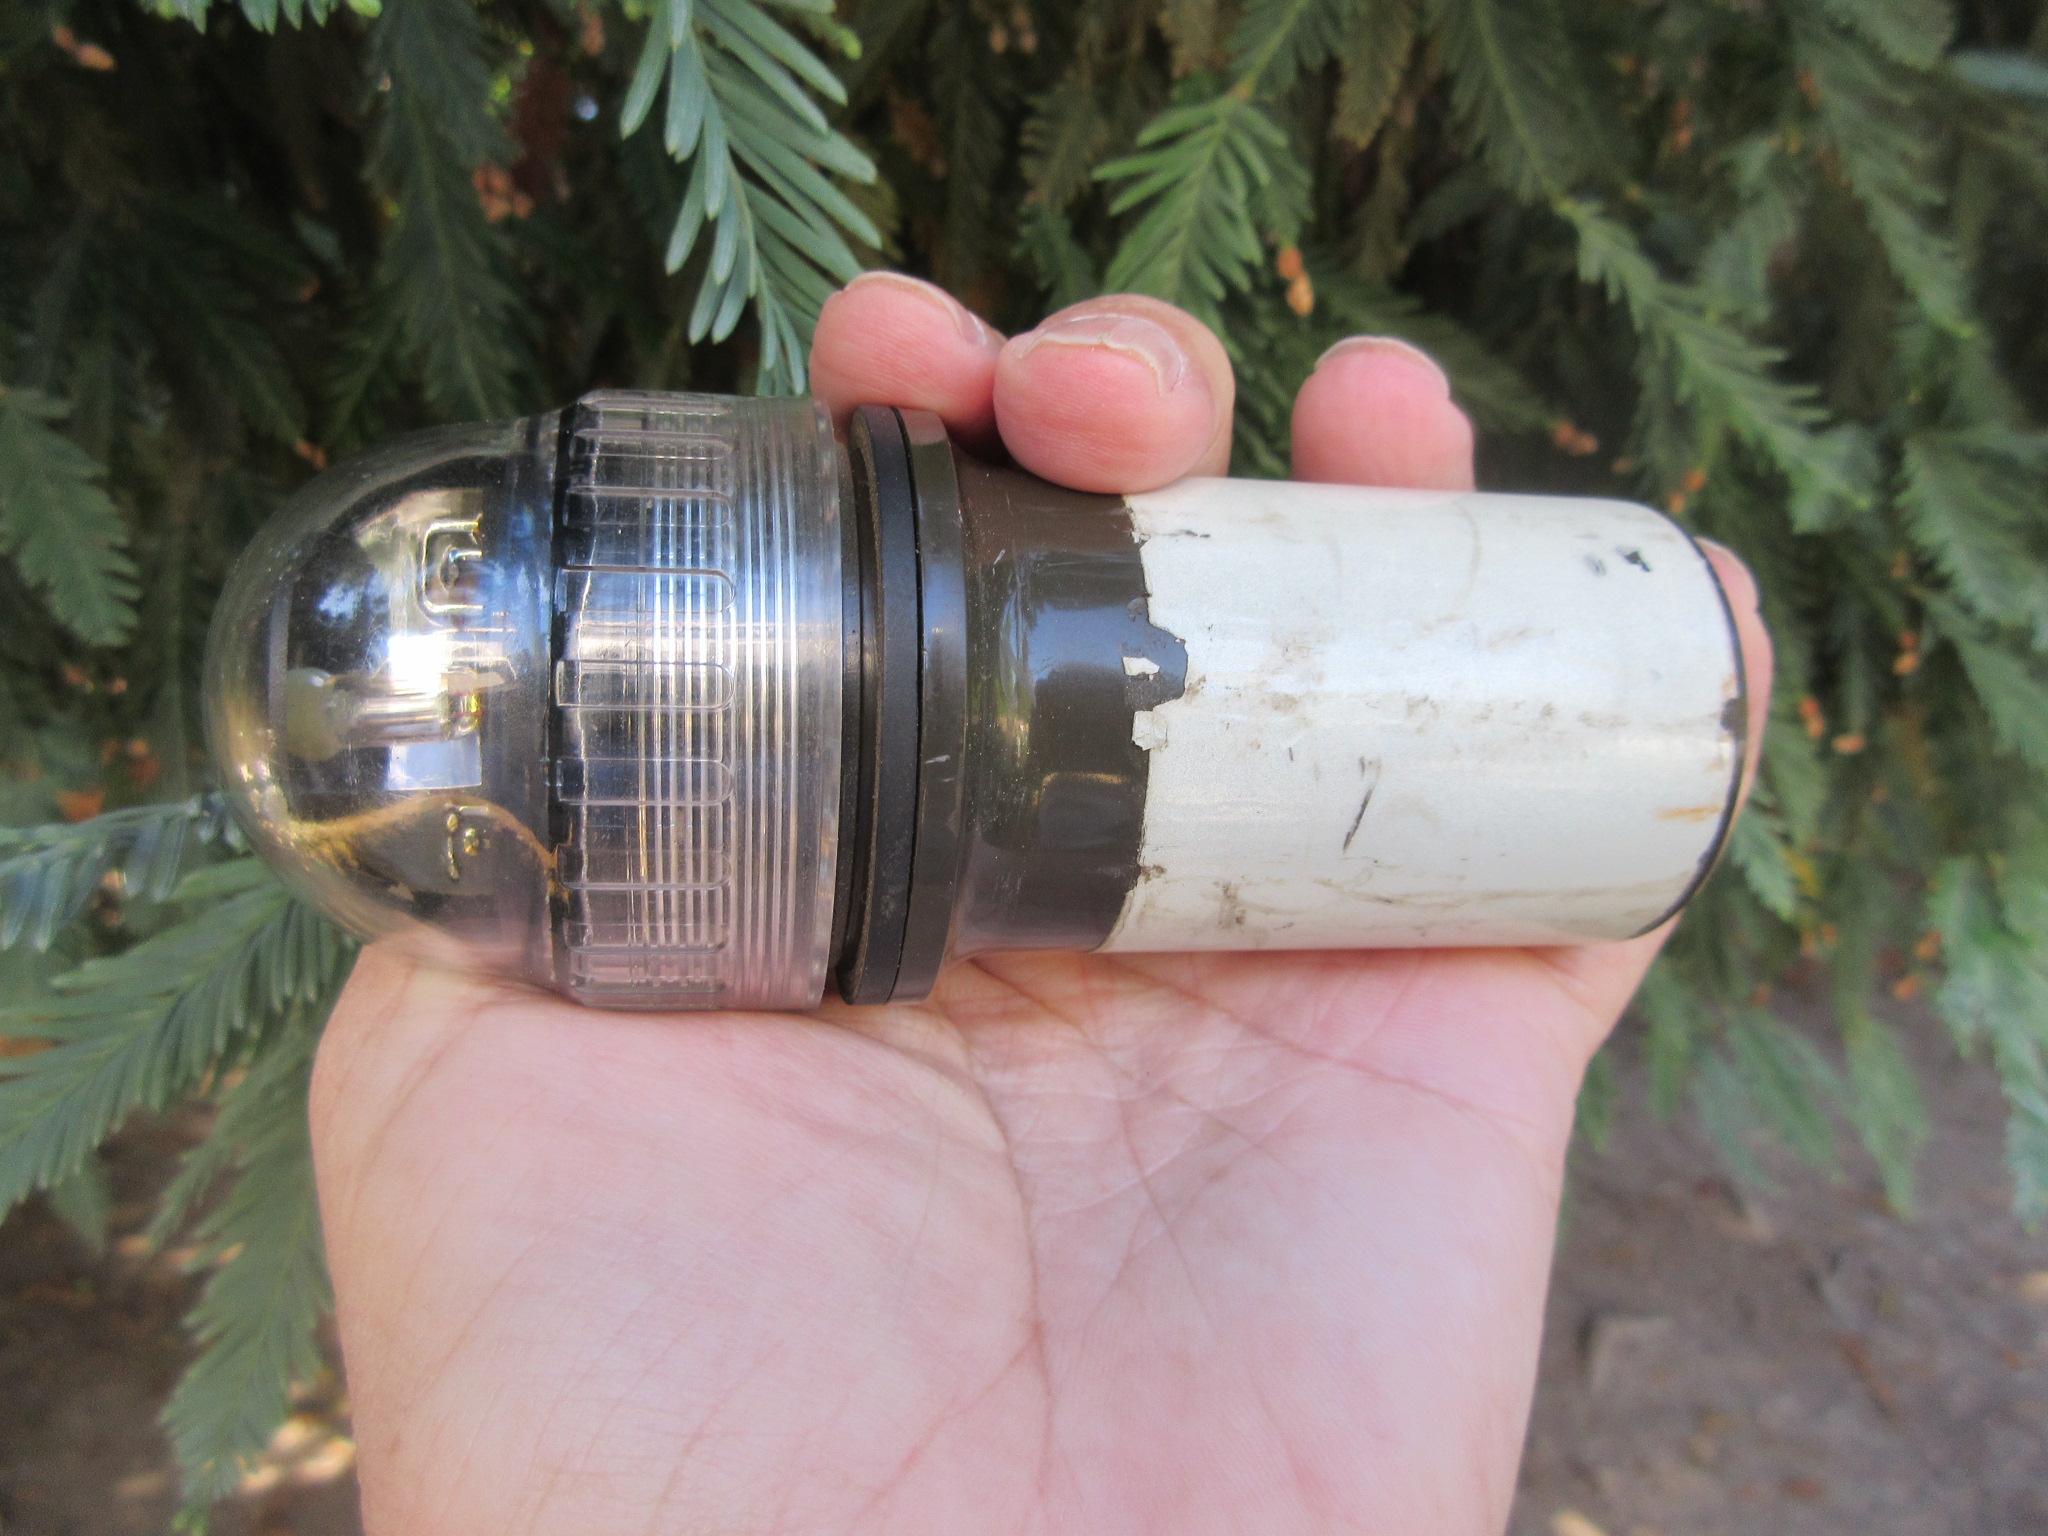
Minefield marker strobe
Powered by a single BA-30 (D Cell), they flash a small T-2 neon lamp at approximately once per second, emitting an orange flash that can easily be seen with night vision optics, especially Gen 3 and 4 devices over long ranges. (Probably minimal IR emission.) Designed to be otherwise pretty dim, they can also be seen with an unaided eye at close range.
They make an effective, covert night-time locator beacon when aimed at search and rescue assets or your buddies’ ingress route while they try to find your campsite at night. They radiate in 180 degrees azimuth and approximately 30 degrees elevation so they are pretty directional. Will probably run for a hundred hours per battery. That white tape around the base is passive-reflective in visible and infra red light (when all else fails…).
Another simple, effective, cheap alternative is a Red LED flasher light designed for bicycling at night. Visible to the eye but also quite effective in marking a location at night.
Heck – I hope they DON’T come to find me – I’m having a great time out here!
The Trusty ALICE Pack & related. Some common sense stuff:
The great Medium ALICE (All purpose Light Individual Carrying Equipment) pack* is my go-to bag for Bush Ops or even general purpose travels. Like most USGI equipment which can be heavy, it is hard to beat, or damage. Mine has served me well for a long time. (*Ruck if you’re in the US Army..)
They don’t benefit from over-thinking and they don’t need to be “set up” Keyboard Commando style. “Modifications” are really not required or necessary but some very simple additions if you like:

ALICE Pack carrying handle
An obvious improvement for just moving the bag, off-shoulders; better than just grabbing the big shoulder pad. Soft vinyl tubing, 550 cord through the LC-2 strap loops. Or if just using the frame for carrying radios etc. this works: Simple. (BTW, what ever happened to all those LC-2 shoulder straps for the ALICE Packs? Currently unobtanium from anywhere except China…)

Another simple preparation is to water proof the inner side of the top flap compartment. The original rubberized inner coating has since worn off rendering the bag contents vulnerable to rain. Someone recommended spraying Flex Seal on the underside of the flap which is a good repair idea.

Flex Seal should work OK but what about the contents of the Map compartment under the lid? I prefer to just hose down the top/outside with Scotch Gard – keeps your stuff dry but also protects the maps in the pouch between the flaps. Better.
Not my original idea but here’s another obvious modification to the cinch straps. The issued straps/buckles work fine but impossible to open with one hand and you sometimes have to entirely remove the straps from the buckles to load the bag. Here is a better way that still allows one to use the original buckles if necessary. If you only make one “Mod” to the bag, do this one:

The above are the type with the removable steel loop-pin. You can attach the female end to the bag without cutting or sewing the fixed web loop. Simple. REI has them.

One-handed operation to unbuckle. Now the entire strap releases and clears the top of the bag for loading/unloading. The orange tag was to ID mine among a pile of others on the Tarmac.
Here’s a simple improvement to my veteran USGI Stainless Steel canteen: Removable cap via a fishing swivel clip on the chain.

The above allows you to heat the canteen directly in/near a fire without melting the bakelite cap. I prefer these stainless steel canteens to the newer plastic ones: They don’t take on the taste of the last liquid you had in it and you can heat these directly in/near a fire. A little heavier, would be better with a wider mouth (eg: packing with snow), but Embrace the Suck, it’s worth it.
Another advantage of the SS canteen: when full, it does not float. For Chillin’

Great to start off on an early spring hike with a canteen full of 34 degree water!
As we know, the USGI Mess Kit was not made for cooking. It was made for receiving Class A or B Rations being served in a field kitchen chow line, but like everything else, along with the essential canteen cup, it is versatile.
Speaking of chow, here is a good trick from back in WWI to “lock” the handle of the USGI mess kit pan. Keeps it from flopping around on the hinge while cooking/frying something.

A really handy helper: Carved, notched stick wedges in tightly between the hinge and the far end of the handle. Makes for a rigid handle while heating or pouring stuff – no flopping around and dumping your chow. Great while making Battalion Landing Team (BLT) sammitches.

Above: My old set is a mongrel: Stainless steel pan, aluminum tray.
Is there newer, high-speed, low-drag gear out there? Sure. Its Mystique Factor? Zero…..
“Old School” means REAL!
Improvise, Adapt, Overcome….
Under-rated website you have here; you’re posting some great content. All useful and interesting. Please keep it coming!